BackSplash review by John : ( Big Splash is now Backsplash v2 )
Some of you’re readers might be interested in a review of one of Perttu Korhonen’s folding
kayaks, called “Big Splash”. I was looking for a way of traveling with acouple of recreational
kayaks in a camping van.The van is close to 10 ft high so lifting and securing 50 lb kayaks on top
is out of the question. There is just too much risk for personal injury or damaging the vehicle.
One kayak does fit inside but not two. It takes some jockying to fit it in without damaging
anything inside and it limits access while traveling. I looked at ways of attaching the boats to the
back of the van standing them up on end as is done with large rv’s and travel trailers. However
this blocks acess to the rear doors and leaves 3 to 4 ft of boat sticking above the roof line. Not
good for gas mileage, probably exceeds road height limitations, and all to easy to snag low
hanging branches in campgrounds. The only practical alternatives seemed to be folding and
inflatable kayaks. I eventually purchased an inflatable kayak which actually has worked out quite
well but it does require carrying 2 air pumps, takes time to inflate, lots of time to dry out and is a
pain to pack up. It has a pretty tough skin but there is always the risk of puncture.
When I came across Perttu’s design for his folding, backpacking kayak I thought this could be the
answer for carrying a hard shell kayak in a small RV. Folded it is not that much larger than a
packed inflatable. I ordered the downloadable plans for the 10’4”BackSplash”. When I contacted
Perttu and mentioned how I planned to use the boat he kindly provided me with plans for a
slightly larger 10’10” version he had drawn up called “BigSplash”. This version is slightly larger
overall but has a significantly longer stern section for increased load capacity. The reasonably
priced plans provided assembly instructions, matetials list, plus highly detailed diagrams,
drawings and cutting patterns for the boat, a packframe, and a sprayskirt. Since backpacking was
not my objective, ultra low weight was not a concern. I chose to construct it using 4 mm okume
marine ply and 6 oz fiberglass cloth rather than the lighter materials he recommends for
backpacking. Construction time was a little over a month. Estimated materials cost is about $300
using marine ply, epoxy and fiberglass cloth.

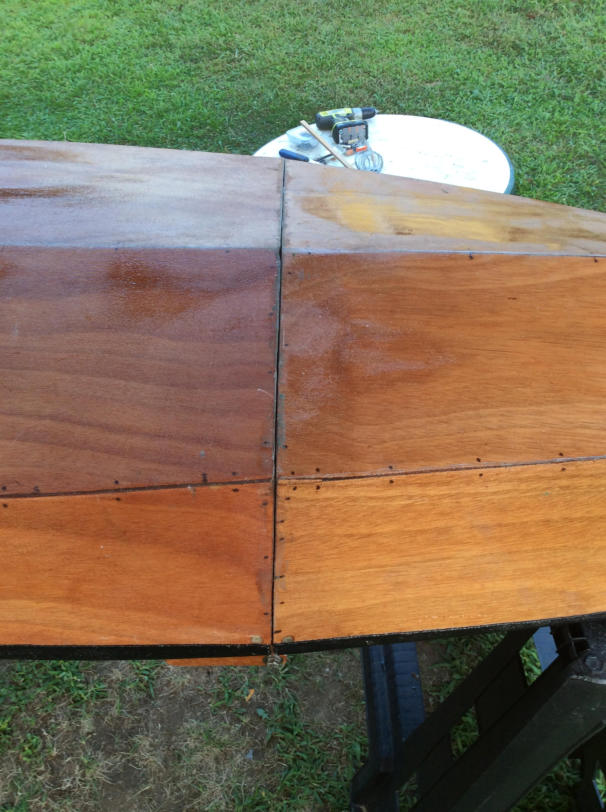
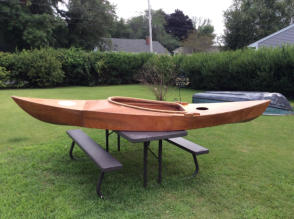
One aspect of the build that appealed to me was the boat is built in three seperate sections
so there is no need to splice together long panels from 4x8 sheets of ply. The sections are
small enough to be constructed inside a small room. It is an easy stitch and glue design,
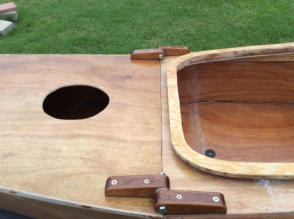
using simple panel shapes. The most complicated structure is the cockpit deck which is not
difficult. After construcing the deck I enlarged the opening from 30 to 38 inches for easier
access. The middle section of the boat, the cockpit, sees the most stress and wear so I
reinforced it with 6 oz fiberglass cloth on all surfaces both inside and out. This has resulted
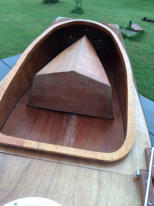
in a nice solid cockpit with little to no flex in the floor. The bow and stern sections are fully
enclosed flotation tanks so only the exterior surfaces need to be glassed while the inside is
just epoxy coated. The inside seams are filleted, and reinforced with glass tape.
There are several unique aspects to the building of a sectional boat that are not encountered
in a conventional build. The most critical is insuring that the sections mate up properly
when assembled. The mating faces must be flat and parrallel with minimal gap between
them. Unfortunately mine needed some help due to some warping in the lumber backing
up the plywood faces. To correct this the sections were bolted together with polyethylene
plastic sheeting between them. A stiff epoxy putty was stuffed into the gaps between the
faces to build up the edges. Once the epoxy cured and the sections seperated, any voids in
the faces were filled with more epoxy putty. After the faces cured, they were sanded and
reinforced with a layer of fiberglass cloth.
If I were to build another sectional boat I would consider building the middle or cockpit
section first and then build the bow and stern sections to match it. The other option is to
build the boat like a nesting dinghy in one peice then cut it into sections afterward. These
methods should result in better fit and less follow up work.
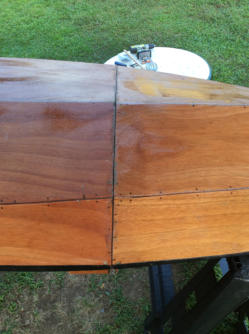
Another critical point is making sure the hull sections are properly aligned with each other
before drilling the bolt holes. The bolt hole pattern is marked onto both faces of the
cockpit section before any decks are installed. 3/8” bolt holes are drilled perpendicular to
the cockpit faces. The bow and stern sections are aligned with the cockpit and clamped
securely to it
The holes in the cockpit faces act as guides to extend the bolt holes through the bow
and stern sections. I choose to use 2 1/2” long 3/8” stainless hex head bolts for
assembly hardware rather than 3/8” threaded rod. The bolt heads face inside the cockpit
while the wingnuts and threaded ends reside in the bow and stern sections. This reduces
risk of bodily injury from protruding hardware in the cockpit. This may necessitate
carrying a small wrench in the boat to loosen the bolts if the wood swells. But so far
that has not been an issue, using the wingnuts to push the bolts back out the holes.
A 3rd area of concern is alignment of the wood hinges. After the decks have been
installed 2 pairs of hardwood/ply wood hinges are screwed and glued to the rear of the
cockpit deck and to the forward edge of the stern deck. Hinge Alignment is critical for
the stern section to fold smoothly over the cockpit. A 2 ft length of hardwood dowel or
metal rod can temporarily be used in place of the 5/16” bolts to insure the hinges are in
alignment with each other when they are attached to the deck. Initially the hinges
should only be attached with screws until you have tested that the boat folds properly. I
was tempted to use metal hinges but the wood hinges look better, are lighter and have
the needed height to insure the stern section clears the back of the coaming. The bolts
can holding the two halves of each hinge together can be removed allowing you to
seperate the stern from the cockpit section if need be.
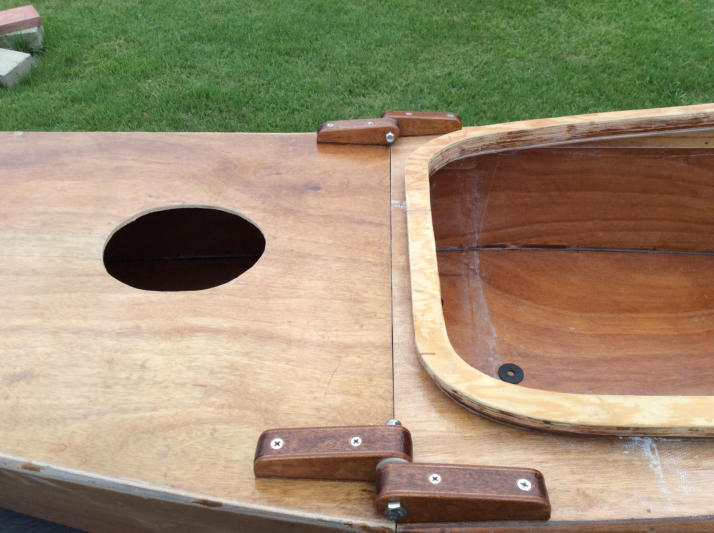
A piece of 1/2 inch doug fir exterior ply was used to make up the coaming pieces. Its
makes for a nice hard coaming but is somewhat difficult for machining smooth fair
curves. Next time I’d use baltic birch or marine ply. Perttu includes instructions for a
seat and foot braces. I left them out to experiment with alternative seating
arrangements. At 5’11”tall and size 11 feet I can comfortably brace against the forward
bulkhead wearing a pair of crocs and a thick back cushion. People much over 6 ft tall
and or with greater than size 12 shoes might find the cockpit a bit cramped. A shorter
person could insert some foam blocking up against the forward bulkhead to brace
against or install adjustable foot pegs.
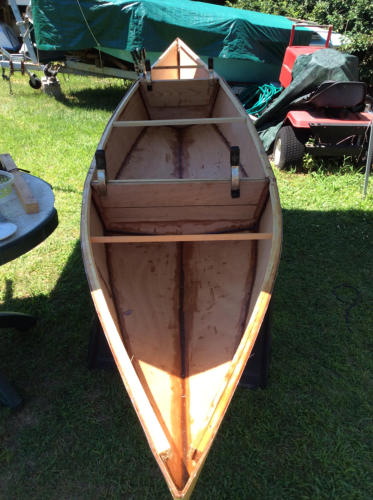
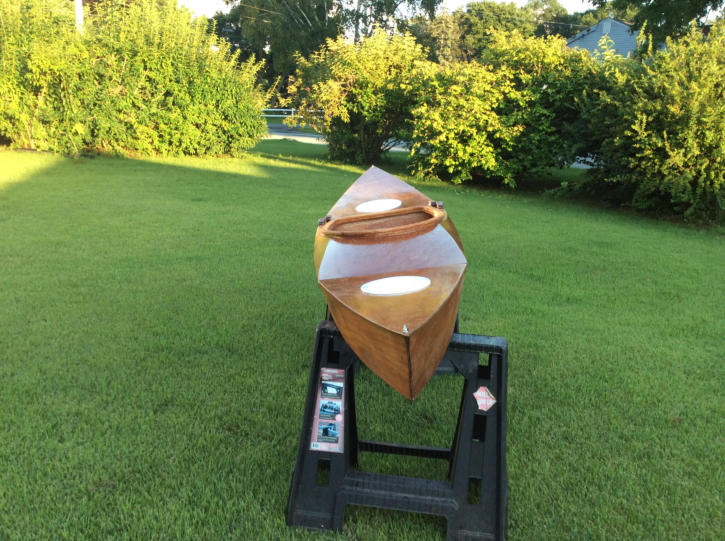
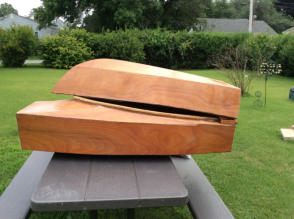
A rope through the stern strap eye tied around the cockpit section works well for
keeping the folded boat together for transport. The bow section fits inside the cockpit
with plenty of room for the rest of your paddling gear and is held in place with boat
cushions and life perserver.

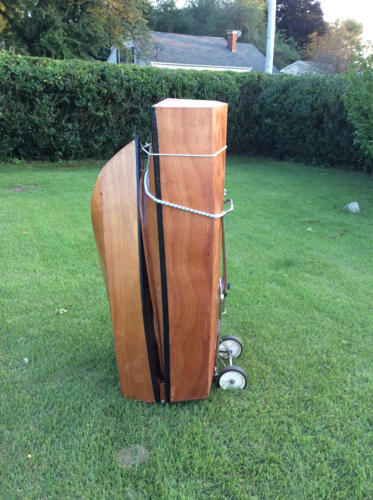
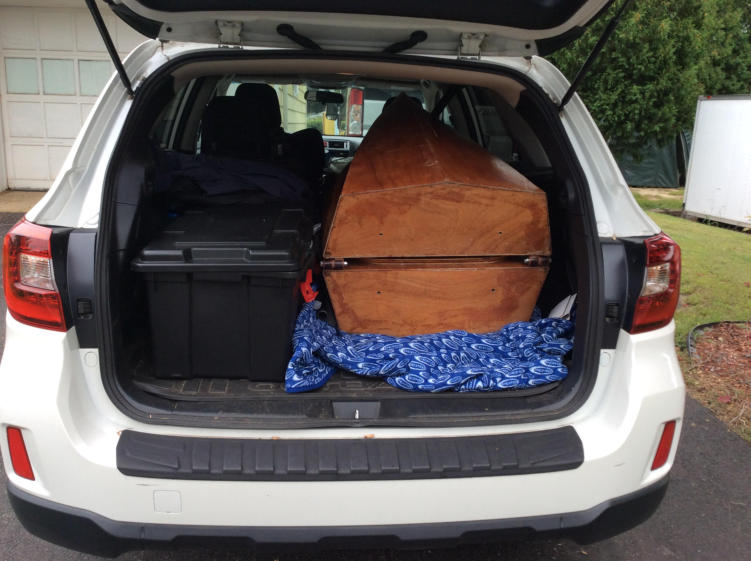
A small tupperwear container comes in handy for storing the assembly hardware. The
folded boat is 52”high, 25”by 25” so it fits nicely in the back of the van standing up, or
laid on its side and easily slides into the back of a small SUV. My ultimate goal is to carry
it outside on the back of the van like a spare tire using an old bike rack.

Despite its heavier construction the boat’s weight is the same as my inflatable, 33 lbs,
which is significantly lighter than most plastic kayaks. If this is still too heavy, you could
build the backpacking version or the folded boat could be moved with a small carry-on
luggage cart, or even carried to the waters edge in sections
Be forwarned the boat is more tender than your average recreational kayak. With it’s
V shaped bottom and 26” beam it feels more like a sea kayak or white water boat.
The lower you sit the more stable it becomes so its best to sit on the floor with a foam
pad or gel seat. When I switched from a 2” boat cushion to a 3/4” foam pad I was much
more at ease testing out the boat’s capabilities. It’s very nimble and responsive to the
paddle and body lean. It will spin 90 degs. with 1 or 2 sweep strokes. Great for small
winding rivers. It paddles easily and is as fast or faster than most plastic kayaks its size.
I built it without the tracking skeg so it paddles fine in calm conditions but is difficult to
control in stiff winds. A skeg is probably a good idea if you plan to paddle alot in open
water. Being a relatively short boat there is some yaw (side to side) motion as you
paddle so a skeg should help reduce that. The boat alone is too tender for fishing or
photography but the addition of a small pair of outriggers would allow one to enjoy
these activities as well.
The boat was built for travel but it’s so easy to load in the back of the car at a moments
notice that it’s getting alot of use at home. Its ease of transport is especially appreciated
at the end of the day. If you’re too tied to unpack at home, just keep it locked in the car
overnight or leave it there until the next trip.
Assembly or dissasembly is fast and simple using 3 bolts and wingnuts in the bow and 2
in stern. They are located above the waterline but rubber washers against the bulkheads
insure there is no seepage.
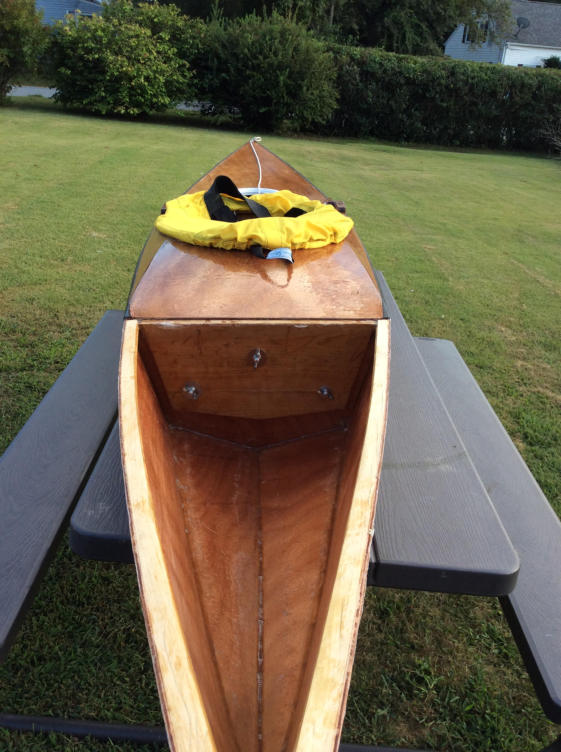
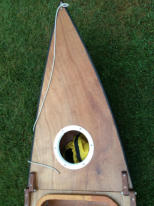
The 6 inch dia. hatch in the bow provides plenty of room for assembly while the 8
in.dia. hatch in the stern provides ample room for storage.


I was concerned that a sectional boat might not perform well but for all practical purposes
it feels and behaves like a single piece hull. On the water you quickly forget that it’s a
folder. People seem to like its looks and no one has yet realized that it’s a folder. My wife
jokes that I saved some big bucks because she says on the water it looks like the small
kevlar/composite pack canoes we see up in the Adirondacks. I don’t know about that.
They are beautiful boats and feather light but for all their expense you still can’t fit them
inside the car. A folder like this is such a simple and clever solution to small boat
transport and storage that it’s amazing more people haven’t thought of it. If you think this
might be a solution to your travel or storage needs then check out Perttu’s YouTube
videos showing his original Back Splash in action. This larger version paddles even
better!


BackSplash review by John : ( Big Splash is now Backsplash v2 )
Some of you’re readers might be interested in a review of one of Perttu Korhonen’s folding
kayaks, called “Big Splash”. I was looking for a way of traveling with acouple of recreational
kayaks in a camping van.The van is close to 10 ft high so lifting and securing 50 lb kayaks on top
is out of the question. There is just too much risk for personal injury or damaging the vehicle.
One kayak does fit inside but not two. It takes some jockying to fit it in without damaging
anything inside and it limits access while traveling. I looked at ways of attaching the boats to the
back of the van standing them up on end as is done with large rv’s and travel trailers. However
this blocks acess to the rear doors and leaves 3 to 4 ft of boat sticking above the roof line. Not
good for gas mileage, probably exceeds road height limitations, and all to easy to snag low
hanging branches in campgrounds. The only practical alternatives seemed to be folding and
inflatable kayaks. I eventually purchased an inflatable kayak which actually has worked out quite
well but it does require carrying 2 air pumps, takes time to inflate, lots of time to dry out and is a
pain to pack up. It has a pretty tough skin but there is always the risk of puncture.
When I came across Perttu’s design for his folding, backpacking kayak I thought this could be the
answer for carrying a hard shell kayak in a small RV. Folded it is not that much larger than a
packed inflatable. I ordered the downloadable plans for the 10’4”BackSplash”. When I contacted
Perttu and mentioned how I planned to use the boat he kindly provided me with plans for a
slightly larger 10’10” version he had drawn up called “BigSplash”. This version is slightly larger
overall but has a significantly longer stern section for increased load capacity. The reasonably
priced plans provided assembly instructions, matetials list, plus highly detailed diagrams,
drawings and cutting patterns for the boat, a packframe, and a sprayskirt. Since backpacking was
not my objective, ultra low weight was not a concern. I chose to construct it using 4 mm okume
marine ply and 6 oz fiberglass cloth rather than the lighter materials he recommends for
backpacking. Construction time was a little over a month. Estimated materials cost is about $300
using marine ply, epoxy and fiberglass cloth.
One aspect of the build that appealed to me was the boat is built in three seperate sections
so there is no need to splice together long panels from 4x8 sheets of ply. The sections are
small enough to be constructed inside a small room. It is an easy stitch and glue design,
using simple panel shapes. The most complicated structure is the cockpit deck which is not
difficult. After construcing the deck I enlarged the opening from 30 to 38 inches for easier
access. The middle section of the boat, the cockpit, sees the most stress and wear so I
reinforced it with 6 oz fiberglass cloth on all surfaces both inside and out. This has resulted
in a nice solid cockpit with little to no flex in the floor. The bow and stern sections are fully
enclosed flotation tanks so only the exterior surfaces need to be glassed while the inside is
just epoxy coated. The inside seams are filleted, and reinforced with glass tape.
There are several unique aspects to the building of a sectional boat that are not encountered
in a conventional build. The most critical is insuring that the sections mate up properly
when assembled. The mating faces must be flat and parrallel with minimal gap between
them. Unfortunately mine needed some help due to some warping in the lumber backing up
the plywood faces. To correct this the sections were bolted together with polyethylene
plastic sheeting between them. A stiff epoxy putty was stuffed into the gaps between the
faces to build up the edges. Once the epoxy cured and the sections seperated, any voids in
the faces were filled with more epoxy putty. After the faces cured, they were sanded and
reinforced with a layer of fiberglass cloth.
If I were to build another sectional boat I would consider building the middle or cockpit
section first and then build the bow and stern sections to match it. The other option is to
build the boat like a nesting dinghy in one peice then cut it into sections afterward. These
methods should result in better fit and less follow up work.
Another critical point is making sure the hull sections are properly aligned with each other
before drilling the bolt holes. The bolt hole pattern is marked onto both faces of the
cockpit section before any decks are installed. 3/8” bolt holes are drilled perpendicular to
the cockpit faces. The bow and stern sections are aligned with the cockpit and clamped
securely to it

The holes in the cockpit faces act as guides to extend the bolt holes through the bow
and stern sections. I choose to use 2 1/2” long 3/8” stainless hex head bolts for
assembly hardware rather than 3/8” threaded rod. The bolt heads face inside the cockpit
while the wingnuts and threaded ends reside in the bow and stern sections. This reduces
risk of bodily injury from protruding hardware in the cockpit. This may necessitate
carrying a small wrench in the boat to loosen the bolts if the wood swells. But so far
that has not been an issue, using the wingnuts to push the bolts back out the holes.
A 3rd area of concern is alignment of the wood hinges. After the decks have been
installed 2 pairs of hardwood/ply wood hinges are screwed and glued to the rear of the
cockpit deck and to the forward edge of the stern deck. Hinge Alignment is critical for
the stern section to fold smoothly over the cockpit. A 2 ft length of hardwood dowel or
metal rod can temporarily be used in place of the 5/16” bolts to insure the hinges are in
alignment with each other when they are attached to the deck. Initially the hinges
should only be attached with screws until you have tested that the boat folds properly. I
was tempted to use metal hinges but the wood hinges look better, are lighter and have
the needed height to insure the stern section clears the back of the coaming. The bolts
can holding the two halves of each hinge together can be removed allowing you to
seperate the stern from the cockpit section if need be.
A piece of 1/2 inch doug fir exterior ply was used to make up the coaming pieces. Its
makes for a nice hard coaming but is somewhat difficult for machining smooth fair
curves. Next time I’d use baltic birch or marine ply. Perttu includes instructions for a
seat and foot braces. I left them out to experiment with alternative seating
arrangements. At 5’11”tall and size 11 feet I can comfortably brace against the forward
bulkhead wearing a pair of crocs and a thick back cushion. People much over 6 ft tall
and or with greater than size 12 shoes might find the cockpit a bit cramped. A shorter
person could insert some foam blocking up against the forward bulkhead to brace
against or install adjustable foot pegs.
A rope through the stern strap eye tied around the cockpit section works well for
keeping the folded boat together for transport. The bow section fits inside the cockpit
with plenty of room for the rest of your paddling gear and is held in place with boat
cushions and life perserver.
A small tupperwear container comes in handy for storing the assembly hardware. The
folded boat is 52”high, 25”by 25” so it fits nicely in the back of the van standing up, or
laid on its side and easily slides into the back of a small SUV. My ultimate goal is to carry
it outside on the back of the van like a spare tire using an old bike rack.
Despite its heavier construction the boat’s weight is the same as my inflatable, 33 lbs,
which is significantly lighter than most plastic kayaks. If this is still too heavy, you could
build the backpacking version or the folded boat could be moved with a small carry-on
luggage cart, or even carried to the waters edge in sections

Be forwarned the boat is more tender than your average recreational kayak. With it’s
V shaped bottom and 26” beam it feels more like a sea kayak or white water boat.

The lower you sit the more stable it becomes so its best to sit on the floor with a foam
pad or gel seat. When I switched from a 2” boat cushion to a 3/4” foam pad I was much
more at ease testing out the boat’s capabilities. It’s very nimble and responsive to the
paddle and body lean. It will spin 90 degs. with 1 or 2 sweep strokes. Great for small
winding rivers. It paddles easily and is as fast or faster than most plastic kayaks its size.
I built it without the tracking skeg so it paddles fine in calm conditions but is difficult to
control in stiff winds. A skeg is probably a good idea if you plan to paddle alot in open
water. Being a relatively short boat there is some yaw (side to side) motion as you
paddle so a skeg should help reduce that. The boat alone is too tender for fishing or
photography but the addition of a small pair of outriggers would allow one to enjoy
these activities as well.
The boat was built for travel but it’s so easy to load in the back of the car at a moments
notice that it’s getting alot of use at home. Its ease of transport is especially appreciated
at the end of the day. If you’re too tied to unpack at home, just keep it locked in the car
overnight or leave it there until the next trip.

Assembly or dissasembly is fast and simple using 3 bolts and wingnuts in the bow and 2
in stern. They are located above the waterline but rubber washers against the bulkheads
insure there is no seepage.

The 6 inch dia. hatch in the bow provides plenty of room for assembly while the 8
in.dia. hatch in the stern provides ample room for storage.
I was concerned that a sectional boat might not perform well but for all practical purposes
it feels and behaves like a single piece hull. On the water you quickly forget that it’s a
folder. People seem to like its looks and no one has yet realized that it’s a folder. My wife
jokes that I saved some big bucks because she says on the water it looks like the small
kevlar/composite pack canoes we see up in the Adirondacks. I don’t know about that.
They are beautiful boats and feather light but for all their expense you still can’t fit them
inside the car. A folder like this is such a simple and clever solution to small boat
transport and storage that it’s amazing more people haven’t thought of it. If you think this
might be a solution to your travel or storage needs then check out Perttu’s YouTube
videos showing his original Back Splash in action. This larger version paddles even
better!


